7. CI/CD
7.1 Concept
Whenever you change something in your project you want to start the build resp. rendering process without being blocked while the result is being computed. Also building a project may consist of many steps (preprocessing, rendering, postprocessing, resizing output to different resolutions, deployment to different output formats etc.) and you want
- to be sure that the chain of steps from the beginning to the final output are reproducible always the same
- to get to know exactly at which phase of the building process something is failing
- to automate the start of the build process by certain triggers like committing something to the repository
CI (Continuous Integration) and CD (Continuous Deployment) are the concepts that allow for reproducible builds and deployments.
On this page we will focus on the way Gitlab has chosen for CI/CD: You can define certain triggers for a build process like scheduled times or commits. The steps of each build will be defined by a configuration file .gitlab-ci.yml. Each step will be executed by a so-called Runner.
7.2 The Token
For the communication between the Gitlab program in the cloud and the runner a token is needed. This token is provided by Gitlab. Log into Gitlab and navigate to Settings, then to CI/CD. There will be a sectioon "Runners" that can be expanded. In the section "Set up a specific Runner manually" you will find an URL and a token that should be noted because it will be needed later.
7.3 Gitlab Runner
Gitlab needs a so-called Runner to execute the steps that are described in the CI/CD configuration file .gitlab-ci.yml. A runner can be a physical computer, a virtual machine, and many more. In the context of Blender and to keep it simple we ignore all the other runners. Instead it will be described at this point on how the prepare a Ubuntu computer or a VM with Ubuntu to act as a runner.
Let's assume the Ubuntu machine is set up in a usual manner. Since we want to use the system to render images with Blender install Blender 2.79 if it is not already on the system. (The background processing with blender 2.80 Beta is at the moment of this writing not working properly). Furthermore we want to use the same machine to do a preprocessing step for which we need the software ImageMagick to be installed.
To act as a runner we need to install the gitlab-runner software. First let's add the Gitlab repository:
sudo apt-get install curl
sudo curl -L https://packages.gitlab.com/install/repositories/runner/gitlab-runner/script.deb.sh | sudo bash
The we install the latest version of GitLab Runner:
sudo apt-get install gitlab-runnerThe runner must be registered:
sudo gitlab-runner register
The user is asked for these points:
- The name of the runner: Type in some name like "Blenderrunner"
- The URL: the URL that was given in the previous step (https://gitlab.com/)
- The executor: in this tutorial we type shell.
- The token: the token that was given in the previous step
- The tags: Specify a tag. This tag can be used to specify which build step will be executed by which runner (because there are multiple runners possible). Later in this tutorial we assume that the tag blender was assigned.
gitlab-runner run
You will see that a new user account is created and has its own home directory in /home. All build processes will run with this user account and the result will also be stored in the home directory. Of course, this is the default behaviour which can be changed if needed.
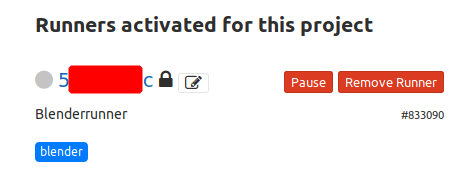
If you refresh the settings page of CI/CD of the Gitlab Web UI you will see the new runner being listed:
7.4 The blender file to render
Let's create a Blender file with Blender version 2.79, save it to the local workspace as MagicCube.blend that was created in the previous Gitlab chapter. Add an image texture.png into a subdirectory img and change the blender file so that it uses that image as texture. Furthermore let's define the rendering frame range from 1 to 3.

Now let's remove the texture.png from the img directory, because we want this texture image to be created in a preprocessing step. So let's put an image (let's name it sampleimage.png into the same directory of the MagicCube.blend.
The proceprocessing step shall put a copyright notice onto the image. This can be done with the convert command if the package ImageMagick was installed. For example let convert add a text and save the image into the img subdirectory with this command:
convert -font helvetica -fill red -pointsize 36 -draw "text 15,150 'Copyright Notice'" sampleimage.png img/texture.png
Next stage shall render the blender file. This can be done with this command:
blender -b MagicCube.blend -o build/result_ -a
In the next sections it will be described how to automate this process with CI/CD pipeline.
7.5 Preparation of a build
Lets create a file with name .gitlab-ci.yml with this content:
stages:
    - preprocess
    - render

preprocess:
    stage: preprocess
    script:
        - echo "Preprocessing of the texture file"
        - convert -font helvetica -fill red -pointsize 50 -draw "text 15,150 'Copyright Notice'" sampleimage.png img/texture.png
    tags: [blender]
    artifacts:
      paths:
        - img/

build:
    stage: render
    script:
        - echo "Rendering the Blender file"
        - mkdir build
        - blender -b MagicCube.blend -o build/result_ -a
    tags: [blender]
    dependencies:
        - preprocess
    artifacts:
        paths:
            - build/
As we can see we have two stages: preprocess and render. The preprocess step contains the commmand to add a copyright notice to the image while the render process requests blender to render the MagicCube.blend file to the output build/result_. For both steps the runner with the tag blender will be used. In this case we have only one machine set up with that tag, but in principle it can be multiple. The output of the first stage preprocess (the image in directory img) must be passed to the next stage render. Therefore we define in the stage render a dependency to stage preprocess and add the path img in the stage preprocess as artifact path. This way the content of the directory img will be passed to the next stage render.
7.6 The first build
Now commit the Blender file MagicCube.blend, the sampleimage.png and the .gitlab-ci.yml and push it to the Gitlab-Repository.
git add MagicCube.blend sampleimage.png .gitlab-ci.yml
git commit -m "Changes"
git push
The last command may ask for the username and the password that was used for registering at Gitlab.
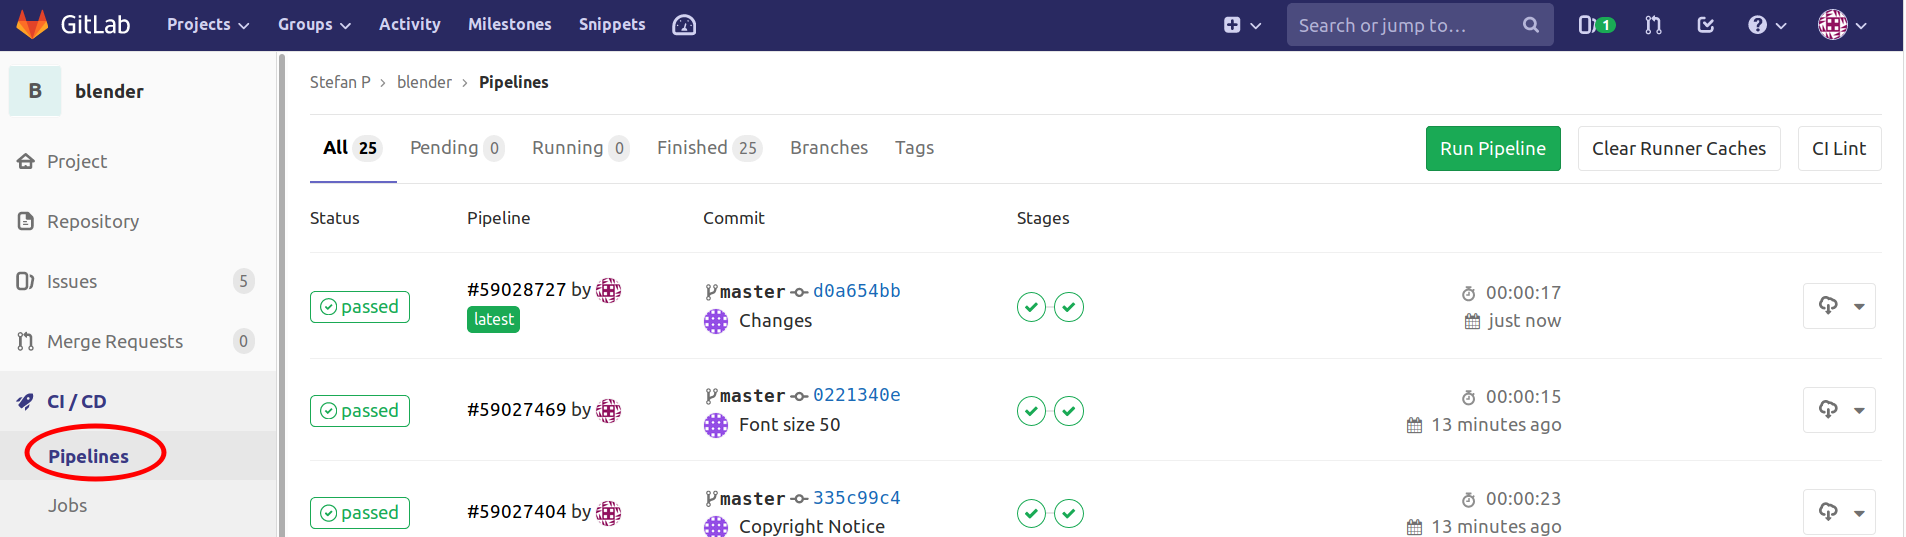
You will see in the CI/CD pipeline of the Gitlab Web UI, that a build process was started, and hopefully completed.
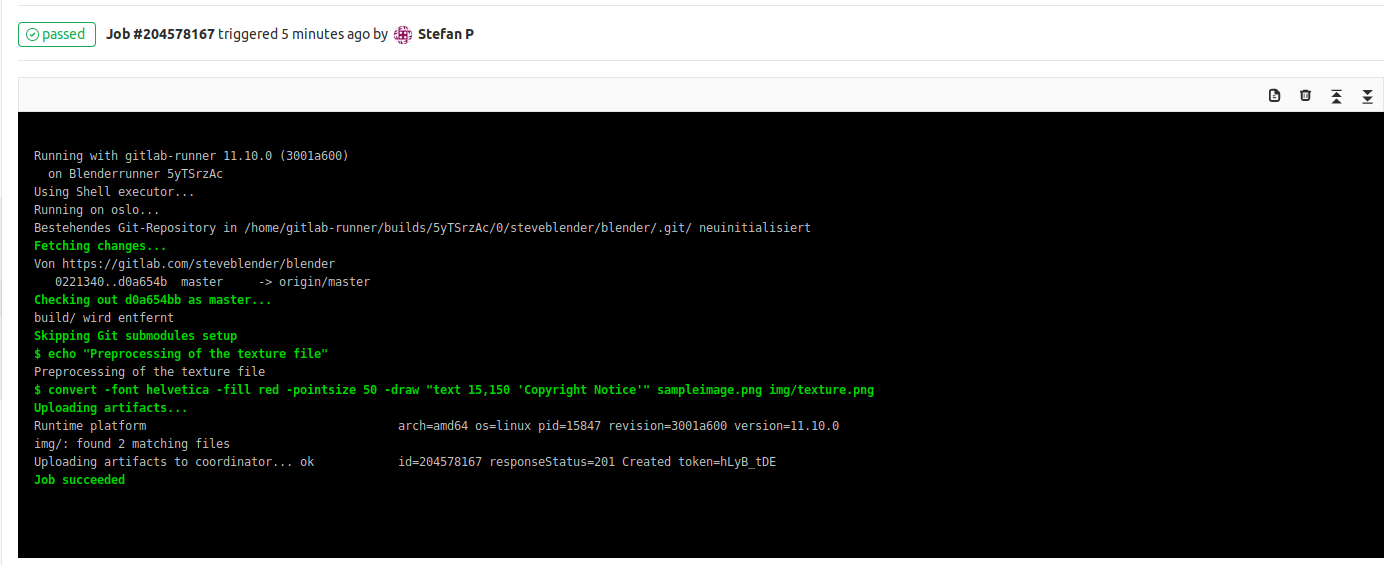
If you want to see the details of the run you can click on it: and you will see each step in the build run, in this case they were called preprocessing and render:

You can dive even deeper and click on the steps so you can see the runner that was chosen and the steps that were executed. In case of the preprocessing stage you will see an output like this:
Of course, you want to see the rendered image. You can download all artifacts that were created during the build:

The donwload contains all the rendered images:

As we can see there are three images rendered of the frame range 1-3 and all of them have the copyright notice. It is also possible to see the output in the Gitlab Web UI without downloading all the build output: If you click on the last stage and click on the Browse artifacts button you can see the output:

If the build process has failed at some point you will see in the pipeline overview. Additionally it is possible to configure Gitlab in the way that an email is sent. Furthermore with a click on the Charts link in Gitlab you can get a visual report of the built processes:
